Hosting PostgreSQL and setup.
IntroductionSo you want to learn yourself a good PostgreSQL. In this document we will go

So you want to learn yourself a good PostgreSQL. In this document we will go through the steps of hosting a PostgreSQL instance on a server in the cloud. Connect to it with a database client, in this case Datagrip. This will provide a good set up to practice connecting to a remote database and working with it. There will be a short discussion on which configuration files to look out for and how to securely configure them.
apt-get repository for Ubuntu.First create the droplet on digitalocean and login with the credentials that are supplied to you.
When logged in to the server, the first step is to update the apt-get repository, and afterwards we need to install the necessary packages.
$ sudo apt-get update
$ sudo apt-get install postgresql postgresql-contribThe postgres community has been around for a long time and has produced many packages and add ons for the database. Most of which can easily be installed with apt-get. To search which ones are available you can execute:
$ apt-cache search postgresWhen first initializing the PostgreSQL instance, there will be a default user created in the operating system in order to work with PostgreSQL. The reason is because you want a user with limited capabilities that will interact with the PostgreSQL instance, instead of the root user which has the privileges to interact with part of the operating system that are critical.
Let's start up the PostgreSQL terminal create a user, a database so that we can connect to it from our client.
$ sudo -u postgres psqlNow that we're in the terminal let's make sure that there is a proper password for the `PostgreSQL user.
\password postgressNext create a new user with which we can login with from the client, choose a proper username and corresponding password.
CREATE USER user_name WITH PASSWORD 'password';Afterwards we create the database and specify the user that has access to it.
CREATE DATABASE name_of_db OWNER user_name;With a connection now established to PostgreSQL at the psqlALTER USER command to change the password for the PostgreSQL user:
ALTER USER postgres PASSWORD 'myPassword';🔑 When PostgreSQL is installed from the Ubuntu packages, by default it is restricted to listening on localhost. This default can be changed by overriding thelisten_addressesin thepostgresql.conffile, but the default prevents the server from automatically listening on a public interface. In addition, thefile only allows connections from Unix/Linux domain sockets and the local loop-back address for the server, so it wouldn’t accept connections from external hosts.pg_hba.conf
What this quote above is essentially saying is that the PostgreSQL server instance will only accept connections from the machine it's hosted on, the localhost in other words. In order to gain access to the server from a remote client we need to specify the IP addresses in the above mentioned configuration files {postgresql.conf, pg_hba.conf} which can be found in the folder at path /etc/postgresql/10/main. Each file has it's own format on how to specify each file.
🎯 Note about editing the files. Depending on how you edit the configuration files on the server you might change the owner and permissions of the file. For example, when connecting to the server using an ftp client and opening up the configuration files with a local text editor such as Sublime Text, during the save process, the original file is replaced with a new one. With all of the necessary permission as a consequence. When restarting the PostgreSQL service, the PostgreSQL server needs for the permissions of the file to be set right in order to load the configuration. Otherwise it won't start. You can take a look at the log file can be found at /var/log/postgresql/postgres-10-main.log.
Let's start with this file as it is the easiest. For this file we only need to change the listening_address parameter. The default setting for this parameter is localhost. We need to add the server IP address to the list as shown below and and we should be good to go. We can specify that the server only listen on IPv4 (0.0.0.0), IPv6 (::) or all interfaces with *.
listen_address='localhost, server_ip_address'The more interesting configuration file is this one, the client authentication configuration file. It's a collection of records that specifies which roles/user, are allowed to connect to witch databases through which hosts with which authentication-method. Simple right? I won't go too much into the details of the file, you can read more about it on the page and at the top of the file.
We will add record of our IP address and for the ones that don't have a static IP address, we will also add the record for the remote machine. Doing so will allow us to access the remote database through an SSH proxy with our local client.
So at the end of the file just add the following line in order to add more host record.
# IP from remote machine, hosted in cloud, for ssh login
host 	    database_name 	your_user 	167.71.9.7/32			  md5
IP from the office
host      database_name 	your_user   109.201.152.10/32   md5
IP for all locations on both IPv4 & IPv6
host     all    	 	      all         0.0.0.0/0           md5
host     all          	  all         ::0/0               md5
Note that it has a straightforward way of specifying the parameters. Also not the sub net post-fix after the IP address.
After updating pg_hba.conf or postgresql.conf, the server needs the config needs to be reloaded. The easiest way to do this is by restarting the PostgreSQL service:
service postgresql restartAnother way to restart PostgreSQL is by doing it withing the console of.
#Enter the psql console as postgres
psql -U postgres

postgres=> SELECT pg_reload_conf();Now that we've gotten so far, let's start by connecting a client to the database server. First let's do this from the terminal. Open up a terminal window and enter the following:
psql -U user_name -h postgres_server_ip -d database_nameIf everything went well you should be in the console of the PostgreSQL server.
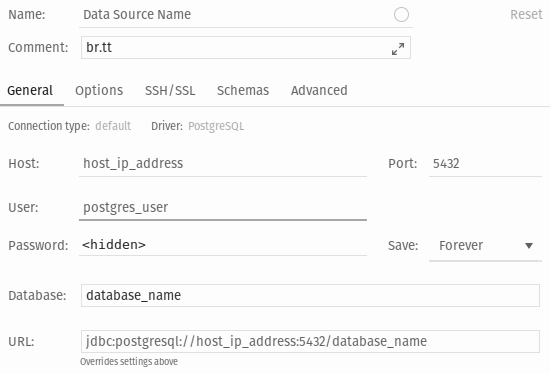
Great let's take a look at how to configure the Datagrip client. If you have managed to connect via the terminal this part should be a piece of cake.
Create a new data source and input all of the correct parameters to create the new data source.
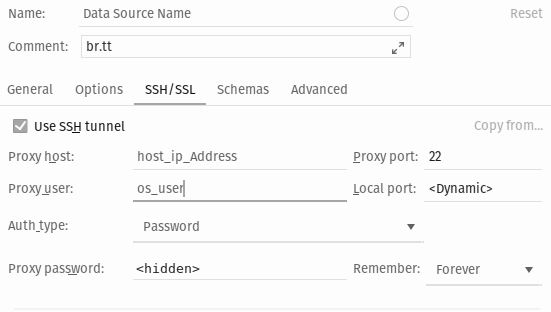
This step is for those of us who are on the move, who do not have a static ip address to work from. With this option we are able to ssh into the server and use it as a proxy for our database client. This way we don't need to keep adding another ip address to the pg_hba.conf file in order to access it.
So now everything is set up so that we can actually start writing some SQL. Let's get started and let's get to it.